In this project, we will see the Automatic Room Lights using
Arduino and PIR Sensor, where the lights in the room will automatically turn ON
and OFF by detecting the presence of a human.
Such Automatic Room Lights can be implemented in your garages,
staircases, bathrooms, etc. where we do not need continuous light but only when
we are present.
Also, with the help of an automatic room light control system, you need not worry about electricity as the lights get automatically off when there is no person.
Circuit Diagram
The following image shows the circuit diagram of the project
implemented using Arduino UNO, PIR Sensor, and a Relay Module.

The following circuit the diagram shows the project being implemented with the help of discrete components for the Relay Module.

Circuit design
PIR Sensor’s Data OUT Pin is connected to Arduino’s Digital I/O
Pin 8. An LED is connected to pin 13 of Arduino to indicate whether the light
is turned ON or OFF.
The IN1 pin of the Relay Module is connected to Pin 9 of Arduino.
A bulb is connected to the mains supply through a relay. One terminal of the bulb is
connected to one wire of the mains supply. The other terminal of the bulb is
connected to the NO (Normally Open) contact of the Relay Module.
COM (Common) contact of the relay is connected to the other wire
of the mains supply.
Component required
·
Arduino UNO
·
PIR Sensor
·
5V Relay Module (Relay Board)
·
LED
·
100Ω Resistor (1/4 Watt)
·
Connecting Wires
·
Breadboard
Power Supply
component description
PIR Sensor
Is used
here to detect the Human body movement, whenever there is anybody movement the
voltage at the output pin changes. Basically, it detects the Change in Heat, and
produce output whenever such detection occurs. there are some useful features
in the PIR sensor like how to change the distance range, how to set the duration
for which the light should be ON etc.

Relay(JQC3F-5VDC-C)
Is an
electromagnetic switch, which is controlled by a small current, and used to
switch ON and OFF relatively much larger current. Means by applying a small
current we can switch ON the relay which allows a much larger current to flow.
Relay is a good example of controlling the AC (alternate current) devices,
using a much smaller DC current. A commonly used Relay is the Single Pole Double Throw (SPDT) Relay,
it has five terminals as below:
 |
| Add caption |
When there is no voltage applied to the coil, COM (common) is
connected to NC (normally closed contact). When there is some voltage applied
to the coil, the electromagnetic field produced. Which attracts the Armature
(lever connected to spring), and COM and NO (normally open contact) gets connected,
which allows a larger current to flow. Relays are available in many ratings, here
we used 5V operating voltage relay, which allows 10A-250VAC 10A 30VDC current to
flow.
Relay is configured by using a small Driver circuit which
consists of a Transistor, Diode, and a resistor. Transistor is used to amplify the
current so that full current (from the DC source – 9v battery) can flow through the coil to fully energies it. The resistor is used to provide biasing to transistors.
And Diode is used to prevent reverse current flow when the transistor is
switched OFF. Every Inductor coil produces equal and opposite EMF when switched
OFF suddenly, this may cause permanent damage to components, so Diode must be
used to prevent reverse current. Here we have used the 5V Relay module.

code of Arduino
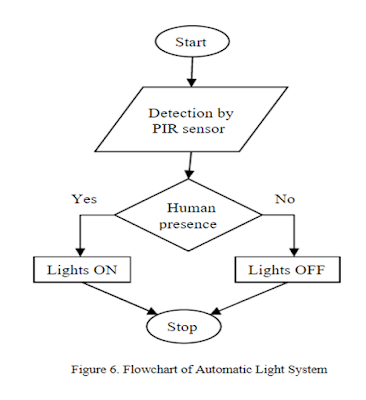
working of the project
The Automatic Room Lights using Arduino and PIR Sensor is a simple the project, where the lights in the room will automatically turn on upon detecting human motion and stay turned on until the person has left or there is no
motion.
Working on this project is very simple and is explained here.
Initially, when there is no human movement, the PIR sensor doesn’t
detect any person and its OUT pin stays LOW. As the person enters the room, the
change in infrared radiation in the room is detected by the PIR Sensor.
As a result, the output of the PIR Sensor becomes HIGH. Since the
Data OUT of the PIR Sensor is connected to Digital Pin 8 of Arduino, whenever
it becomes HIGH, Arduino will activate the relay by making the relay pin LOW
(as the relay module is an active LOW module).
This will turn the light ON. The light stays turned ON as long as
there is movement in front of the sensor.
If the person takes a nap or leaves the room, the IR Radiation
will become stable (there will be no change) and hence, the Data OUT of the PIR sensor will become LOW. This in turn will make the Arduino turn OFF the
relay (make the relay pin HIGH) and the room light will be turned OFF.
overview
Automatic Room Lights System using Arduino is a very useful
project as you need not worry about turning on and off the switches every time
you want to turn on the lights. The main components of the Automatic Room
Lights project are Arduino, PIR Sensor, and the Relay Module.
Out of the three components, the PIR Sensor is the one in focus as
it is the main device that helps in detecting humans and human motion.
In fact, the Automatic Room Lights project can be considered as
one major application of the PIR Sensor. A similar concept is being already
implemented in automatic toilet flush valves, hand dryers, etc.
application
I’ve already mentioned a few applications of the Automatic Room
Lights concept. Some of them are:
·
Garage Lights
·
Bathroom Lights
·
Hand Dryers
·
Toilet Flushers
·
Security Lights
simulation result (in tinkercad)

When an object is not moving then the LED not glows

When object moves then the LED glows

Post a Comment